Tuesday, April 12, 2011

SCCM OSD Prompt For Computer Name

Looking for a way to allow you to prompt for a computer name during the baremetel imaging process? Well thanks to Nick Moseley over at http://t3chn1ck.wordpress.com/ we have a way to do that. Here is the code for the VBS with my changes .

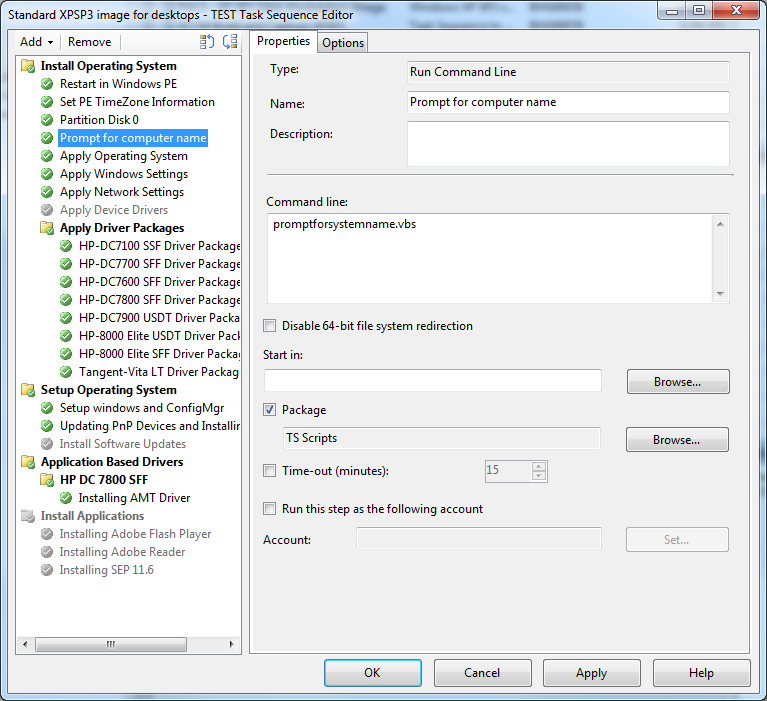
 How To Add To Your Task Sequence

1. Create a New Package, and assign a DP for your script(s) you do not need to create a program for your script.
2. In your task sequence after the Partition Disk task add a task to run a Command Line.
3. In the command line section enter the name of the vbs.
4. Check the package and select the package you created in step 1.


Code:

'==========================================================================
' NAME: PromptForSystemName.vbs
'
' AUTHOR: Nick Moseley
' DATE  : 6/1/2009
'
' COMMENT: This script will detect if the current assigned value for the computer name
' begins with MININT, indicating that this image is bare metal image.  It then prompts
' the end-user to enter a new computer name.
'
' VERSION : 1.1
' 1.0 (12/08/2008)- Intial script to check if the computer name begins with
'  "minint", which indicates the system was booted with CD or PXE.
' 1.1 (06/01/2009)- Added check if the computer name equals "minwinpc",
'  which indicates the system was booted with USB key
' 1.2 (04/07/2011)- Added check for vaild length of ComputerName -Matt Karel
'==========================================================================


Dim sNewComputerName, oTaskSequence, sTSMachineName, bPromptName
Set oTaskSequence = CreateObject ("Microsoft.SMS.TSEnvironment")

' Get the name the computer is set to receive and truncate to first 6 letters
sTSMachineName = lcase(oTaskSequence("_SMSTSMachineName"))

If left(sTSMachineName,6) = "minint" Then
 bPromptName = True
ElseIf sTSMachineName = "minwinpc" Then
 bPromptName = True
Else
 bPromptName = False
End If

' Note: The wscript.echo commands are logged in SMSTS.log for troubleshooting.  They are not displayed to the end user.
If bPromptName = True Then

    Do Until ValidName=1
        wscript.echo "Detected that the computer name is scheduled to receive a random value.  Prompting user to input a standard name."
        sNewComputerName = InputBox ("Please enter a standard computer name to continue.", "Computer Name",sTSMachineName, 30,30)
        ValidName=CheckComputerName(sNewComputerName)
    Loop

    oTaskSequence("OSDComputerName") = UCase(sNewComputerName)
    wscript.echo "Set Task Sequence variable OSDComputerName to: " & sNewComputerName
Else
     wscript.echo "Computer set to receive a standard name, continuing as is."
End If

Function CheckComputerName (CompName)
    If Len(CompName)=0 Then
        result=Msgbox("You must enter a computer name to continue.",vbExclamation+vbSystemModal,"Invaild Input")
        CheckComputerName=0
    ElseIf Len(CompName)<=15 Then
        CheckComputerName=1
    Else
        result=Msgbox(ucase(CompName) & " Is to long of a computer name. Computer names are limited to 15 characters or less.",vbExclamation+vbSystemModal,"Invaild Input")
        CheckComputerName=0
    End if
End Function

Tuesday, April 5, 2011

New Hardware Wizard Running after OSD Deployment

So a colleague and I have been working on a new XP SP3 thin image and have been fighting an issue of the New Hardware Wizard displaying after first login. after much searching and many edits to the sysprep.ini I stumbled upon a post by Ben Tucker* and thought what the heck we will give this a shot. well low and behold it worked. So if You are having issues with the New Hardware Wizard appearing after you image a workstation with SCCM 2007 or MDT add rundll32.exe Syssetup.dll,UpdatePnpDeviceDrivers to a command line task to your task sequence under Setup Operating System  Note:this command is case sensitive.
Enjoy!

-Till Next Time
Matt Karel


Source:
(http://blogcastrepository.com/blogs/brian_tucker/archive/2007/12/11/sccm-2007-osd-drivers-show-as-new-hardware-found-when-you-login.aspx)

Monday, April 4, 2011

Mounting My TV

Just a small little project to mount my bedroom TV and install power and run 2 HDMI cables in the wall. Enjoy.


Wednesday, March 30, 2011

ConfigMgr 2007 R2 SP2 OSD Imaging issue

So for the past several months my coworker and I have been wanting to update our Imaging process from an unatteded install of XP to a true Slim Image using SCCM 2007 OSD.

During the process of doing this we keep running in to an issue of applications not installing when we would bring down our test image that was captured using a CD instead of a Build and Capture task sequence. After much googling we could not find anything that would fix our issue, so we place a call to the boys in blue (Microsoft) after looking though our smsts.log Microsoft noticed a small oddity during the process of installing the SCCM Client.


Basicly what the issue was when OSD would go to install the SCCMClient  it would error out with a 0x80004005 error code. It would error out during this step because CCMSetup was running with a switch of /config:Mobileclient.tcf. the odd thing though was our configmgr package did not have this configured there and we still do not know where this is coming from. So for now we have rename Mobileclient.tcf to .old and wallah the issue is now resolved.

Successfully registered TS Progress UI.    OSDSetupHook    3/30/2011 4:01:38 PM    896 (0x0380)
Executing C:\_SMSTaskSequence\OSD\BHG00077\ccmsetup.exe /useronly /config:MobileClient.TCF /status:1592    OSDSetupHook    3/30/2011 4:01:38 PM    896 (0x0380)
Command line for extension .exe is "%1" %*    OSDSetupHook    3/30/2011 4:01:38 PM    896 (0x0380)
Set command line: "C:\_SMSTaskSequence\OSD\BHG00077\ccmsetup.exe" /useronly /config:MobileClient.TCF /status:1592    OSDSetupHook    3/30/2011 4:01:38 PM    896 (0x0380)
Executing command line: "C:\_SMSTaskSequence\OSD\BHG00077\ccmsetup.exe" /useronly /config:MobileClient.TCF /status:1592    OSDSetupHook    3/30/2011 4:01:38 PM    896 (0x0380)
Process completed with exit code 1    OSDSetupHook    3/30/2011 4:01:39 PM    896 (0x0380)
FALSE, HRESULT=80004005 (e:\nts_sms_fre\sms\client\osdeployment\osdgina\installclient.cpp,1078)    OSDSetupHook    3/30/2011 4:01:39 PM    896 (0x0380)
Client installation failed, code 1    OSDSetupHook    3/30/2011 4:01:39 PM    896 (0x0380)

Tuesday, March 22, 2011

Undocumented Citrix PNAgent Command Line Switches

The list below is a list of undocumented switches for Pnagent.exe Version 12.1.030 but may work on older versions of pnagent. I have used a few of them with success when needing to script an uninstall of a client or needing to manipulate the client in a way without causing a outage. For example I needed to basically have the pnagent reconnect to the server, but need to do it via a script. I ran pnagent.exe /configurl /pram:<our url to WI> and that caused pnagent to reconnect simulating a user terminating pnagent with out terminating and with out losing connection to any open applications.

Use the below list with caution and always test to avoid any unwanted side-affects.


/Terminate Closes out PNAgent and any open sessions
/terminatewait  Closes out PNAgent and any open sessions
/Configurl  /param:URL
/displaychangeserver
/displayoptions
/logoff
/refresh
/disconnect
/reconnect
/reconnectwithparam
/qlaunch

Till Next Time!

Monday, March 21, 2011

Replacing The HD on a 24inch iMac


Using 2 Suction Cups in opposing corners, I remove the glass panel. This glass panel is held on using a series of magnets around the bezel. Once the glass is removed it will expose the necessary T8 Screws that need to be removed.

Once the bezel is removed you will have access to remove the 8 or so T8 screws holding down the LCD panel. Once remove the screws are removed you can lift display. Note that you will want a second set of helping hands as the display cables are still attached to hold the display as the drive is replaced.
With your second set of hands holding the display remove the 2 T8 screws holding the 3.5 inch drive from its mount. Now slide the black drive mount towards the supper drive. Next carefully remove the thermistor that is located on the drive case and disconnect the SATA and Power cables from the drive. Now Pull the drive towards you removing it from the case. 


Friday, March 18, 2011

How to Remove a Contact from Outlook Web App's AutoFill List


  1. Login to the account.
  2. Compose a new message.
  3. In the To field start to type the name of the individual.

  4.  Arrow down till you have highlighted the contact you wish to delete.
  5. Press the Delete Key on your keyboard and the contact will be removed from the AutoFill list before your eyes.